|
Code Roar Reference Manual: Tutorial |
Everyone enjoys working in their own personal environment so Code Roar is design to allow a user a flexible working environment. In this chapter the user will explore configuring foreground and background colors as well as fonts. It would be impossible to cover the complete set of configuration options for Code Roar in this tutorial. For more information on configuring Code Roar refer to the Configuring Code Roar topic.
In this example a simple Verilog file will be created and then the display characteristics of the file will be modified.
To start off, open HDL Workshop and select New File from the File menu to create a new file.
In a temporary directory, create the following Verilog file and save it as tutorial.v.
module d_ff (d, clk, q, q_bar)
input d, clk;
output q, q_bar;
/* At the positive edge of the clock propagate the inputs to the outputs */
always @ (posedge clk)
begin
q <= d;
q_bar <= !d;
end
end module
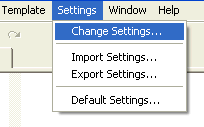
The majority of settings in HDL Workshop are accessible from the Settings menu. In this case the goal is to change the foreground and background colors so start the Settings dialog by selecting Change Settings from the Settings Menu.
Because there are so many settings for HDL Workshop the Settings dialog is divided into multiple tabs. Color settings are specific to individual file types so select the File Types tab to display the configuration options associated with each file type.
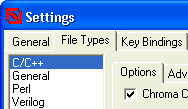
In the File Types tab there is a list of configured file types. Select Verilog from the list and then activate the Coloring tab. This tab allows the user to configure color settings related to any Verilog files that match the configured extensions.
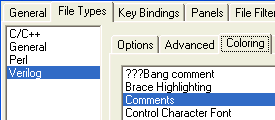
The Coloring tab contains a list of syntactical elements of the Verilog language that HDL Workshop is capable of coloring. In this example the foreground and background color of any comments will be changed. Select Comments from the list below to activate the color settings for any comments.
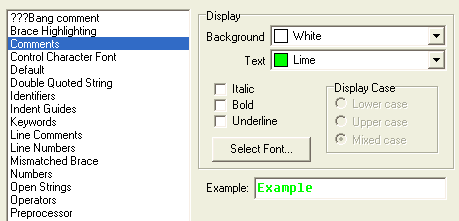
Change the Background color to black and the Text Color to green. Select the Italic and Bold check boxes to display comments in bold italic text. An example of how the comment will be displayed is shown in the Example section.
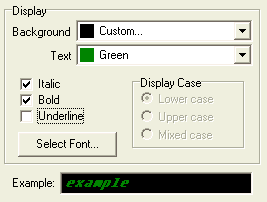
Click Ok in the Settings dialog to accept the new color settings for multiple line comments. The tutorial.v file should now be updated to show the multiple line comment in bold italic green.
For more information on the configuration of colors refer to the Configuring Colors topic.